Neer Dosa
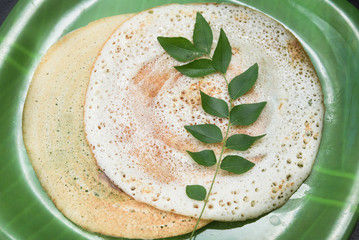
Neer Dosa: Delicate Lacy Crepes from Mangalore
Neer Dosa
30 mins
Cooking Time
Easy
Difficulty
5
Ingredients
Veg
Diet
Among the most loved dishes in South Indian cuisine, these paper-thin rice crepes are a breakfast staple cherished for their unique texture. While the edges turn beautifully lacy and crisp, the centre remains soft and spongy, making each bite a delightful contrast. Served hot with coconut chutney or tangy sambar, they’re comfort food at its finest.
Ingredients
UNITSIngredients
1 cupShort-grained rice or Sona Masoori rice
1/4 cupFresh coconut (grated)
to tasteSalt
2 cupWater
1 tbspCoconut oil or ghee
Beetroot Mysore Pak Recipe: Soft Fudge-Style Indian Mithai With Natural Colour
Beetroot Mysore Pak recipe is a very rich and colorful version of the classic sweet made in South India that is loved for its soft texture and buttery taste. Mysore Pak can be prepared in various ways in homes and regions. Made with fresh beetroot juice for a lovely sweet colour and subtle earthy taste, but still retaining the rich melt-in-mouth quality of the classic recipe. If you're looking for a healthier dessert for your family, making Mysore Pak at home will definitely help you achieve that goal. Apart from being a sweet addition, beets are also a source of vitamins C, folate, potassium and iron. When peanut flour, sugar, milk and ghee are combined, it becomes a smooth and rich melt-in-mouth sweet. This is a really easy beetroot sweet recipe and it doesn't need any fancy ingredients. You can create a delicious, soft Mysore pak in your kitchen with the correct consistency and gentle stirring. This beetroot Mysore pak is ideal for serving after meals or for tea time and as a sweet treat at home for kids to enjoy.65 minseasyCucumber Avalakki Recipe: A Refreshing Twist to Classic Poha
Cucumber avalakki recipe is a simple variation of classic avalakki dishes that are widely prepared in South Indian homes. Traditionally made as a quick and filling meal, avalakki has always been valued for its ease and versatility. Adding cucumber is a thoughtful touch that brings in freshness and a cooling effect, making it especially enjoyable during warmer days. This cucumber avalakki is one of those dishes that will surprise you with how simple yet satisfying it can be. Soft poha tossed with juicy, grated cucumber, fresh coconut, and a light tempering creates a bowl that feels both comforting and refreshing. It’s the kind of recipe you turn to when you want something quick, wholesome, and full of gentle flavours without putting in too much effort. One of the nicest things about this dish is how effortlessly it fits into your routine. Every bite has a lovely mix of textures, from the soft poha to the crunch of peanuts, while the gentle spices add just the right amount of warmth. This avalakki recipe is just right for a quick breakfast or a light snack with your evening tea. No fuss, no long prep, just a simple dish that always tastes good.20 minseasyInstant Atta Palappam: A Wheat-Based Twist On Kerala’s Favourite
The popular palappam from Kerala gets a healthy update with Atta Palappam! Instead of rice or maida, this recipe uses whole wheat flour (atta), a healthy, fibre-rich substitute. Use Aashirvaad Superior MP Atta (100% wheat, 0% maida) to make a consistently soft batter that turns out lacy appams. The distinctive texture and subtle sweetness come from the rice flakes and coconut. The smell of fresh, golden appam will quickly fill your kitchen; there’s no need to soak or wait overnight, simply mix and ferment for an hour. Atta Palappam is ideal for those hectic mornings, quick evening meals, or moments when you want comfort food with a nutritious spin.30 minseasy
Plate it up!
Plate it up!

Share
Save for later
Veg
Nutritious Ragi Wheat Dosa
30mins
|Easy
Share
Save for later
Veg
Fluffy Steamed Sorghum Idli
45mins
|Easy