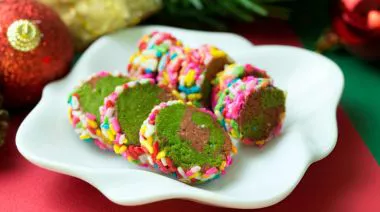
These viral Christmas pinwheel cookies are a stunning holiday dessert that features a beautiful spiral pattern created by rolling three colours of sugar cookie dough together in red, white, and green. Serve these for Christmas Eve supper, or as part of a late morning brunch. After all, it’s the season to be jolly!
Ingredients
UNITSIngredients
3 cupsAll-purpose flour (For the sugar cookie dough)
1 tspBaking powder
½ tspSalt
1 cupUnsalted butter (softened)
1¼ cupsGranulated sugar
1Large egg (at room temperature)
2 tspVanilla extract
For the colourRed gel food colouring
For the colourGreen gel food colouring
1 cupSprinkles (For the sprinkle coating (optional)
Whisk the all-purpose flour, baking powder, and salt in a medium bowl until they are fully combined. This ensures that the leavening agent is evenly distributed throughout the flour. Once combined, set the dry mixture aside.
Description - Step 2
Step 2: Creaming the butter and sugar
Add the softened butter and granulated sugar to the bowl of a stand mixer fitted with the paddle attachment (or use a hand mixer and a large bowl). Beat on medium speed for 2-3 minutes until the mixture becomes light, fluffy, and pale in colour. The sugar should be fully incorporated into the butter. Stop the mixer and scrape down the sides of the bowl to ensure even mixing.
Description - Step 3
Step 3: Adding the egg and vanilla
Add the room temperature egg and vanilla extract to the butter-sugar mixture. Mix on medium-low speed until the egg is fully incorporated and the mixture is smooth. Stop and scrape the bowl again to make sure everything is evenly blended.
Description - Step 4
Step 4: Combining the dry and wet Ingredients
With the mixer on low speed, gradually add the flour mixture to the butter mixture. Mix only until a few streaks of flour remain visible. Stop the mixer and use a rubber spatula to scrape the bottom and sides of the bowl, then finish folding by hand to avoid overworking the dough. The finished dough should be soft and supple but not sticky.
Description - Step 5
Step 5: Dividing the dough
Divide the prepared dough into three equal portions. If using a kitchen scale, each portion should weigh approximately 10 ounces for precise results. Leave one portion plain for the white layer. This step prepares you for colouring the other two portions while keeping the white dough untouched.
Description - Step 6
Step 6: Colouring the dough
Transfer the second portion of dough to a separate bowl and add red gel food colouring. Start with a small amount, about ¼ teaspoon, and knead or mix on low speed just until the colour is uniform. Add more colouring gradually until the dough reaches a vibrant red. Repeat this process for the third portion using green gel food colouring.
Description - Step 7
Step 7: Chill the coloured dough
Once coloured, form each portion into a flat disc about 1 inch thick, wrap tightly in plastic wrap, and refrigerate for at least 45 minutes. Chilling ensures the dough is firm for rolling and shaping.
Description - Step 8
Step 8: Rolling each dough layer
Remove one chilled dough disc from the refrigerator. Place it between two sheets of parchment paper to prevent sticking and avoid adding extra flour, which can toughen cookies. Roll the dough into a rectangle approximately 6 inches wide by 13 inches long, keeping the thickness around ⅛ inch. If the dough softens too much, return it to the refrigerator for 10-15 minutes. Repeat with the remaining two colours, trying to make all rectangles as similar in size as possible.
Description - Step 9
Step 9: Stacking the dough layers
Carefully peel away the top parchment sheet from each rectangle. Stack the rectangles in this order: green on the bottom, white in the middle, and red on top. Gently press the layers together so they adhere. If the dough becomes too soft during stacking, refrigerate the stack for 10 minutes before continuing.
Description - Step 10
Step 10: Rolling the log
Starting from one long edge, carefully roll the stacked rectangle into a tight log, using the parchment to help guide the dough. The finished log should be about 2 inches in diameter.
Description - Step 11
Step 11: Add sprinkles to the log
If desired, brush a thin layer of corn syrup diluted with a few drops of water over the surface to help the sprinkles stick. Roll the dough through sprinkles until the log is evenly coated. Wrap the log tightly in plastic wrap and refrigerate for at least 45 minutes until very firm.
Description - Step 12
Step 12: Slicing the cookies
Preheat your oven to 180°C and line two large baking sheets with parchment paper. Remove the chilled log from the refrigerator and unwrap it. Using a large, sharp chef’s knife, slice the log into rounds just under ½ inch thick (about ⅜ inch).
Description - Step 13
Step 13: Baking the cookies
Arrange the slices about 2 inches apart on the prepared sheets. Bake for 13-15 minutes, rotating halfway through. Cookies are done when they have puffed slightly, lost their shiny appearance, and the edges begin to turn golden. Allow to cool on the baking sheets for 5 minutes before transferring to a wire rack. Once completely cool, serve fresh.