Butter Cookies
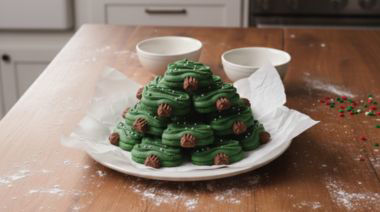
Christmas Tree Butter Cookies– Festive Holiday Treats
Butter Cookies
40 mins
Cooking Time
Intermediate
Difficulty
9
Ingredients
Veg + Dairy
Diet
This Christmas, give your dessert tray a cute cookie makeover. With a delightful butter cookie dough, these Christmas tree butter cookies are dyed with natural food colouring – matcha and cocoa powder. The dough is piped directly onto the baking tray in a sweeping motion to create the iconic Christmas tree shape.
Ingredients
UNITSIngredients
160 gmButter (salted or unsalted, softened)
120 gmPowdered sugar
1 tspVanilla extract
50 mlMilk
200 gmRefined flour (all-purpose flour)
6 gmCocoa powder (unsweetened)
10 gmMatcha powder, optional
5-6 dropsGreen food colouring, adjust to preference
for dustingIcing sugar
Easter Special Recipe: Hot Cross Buns
‘One a penny, two a penny, hot cross buns’ may be more familiar to people, especially in Asian countries, than the famous Easter delicacy, hot cross buns. That phrase belongs to an English nursery rhyme, which is a street hoot that used to be sounded during Easter. It’s also a musical reminder of the recipe presented here: classic hot cross buns. Hot cross buns might look complicated, but they're fairly simple to make. Once you have made it at home, by yourself, the shop-bought version will genuinely be difficult to go back to. This special Easter recipe for hot cross buns produces glazed buns that are big, fluffy, and fragrant – the exact kind you get from a good bakery – with a crumb that is soft without being gluey, and a crust that is golden and shiny from the apricot jam glaze. The dough is made rich with butter, milk, and egg, and spices like cinnamon and allspice, with sultanas and orange zest adding more flavour. The trademark ‘cross’ on the hot buns is made from a simple thick paste of flour and water piped over the top before baking. The glaze is applied immediately after the buns come out of the oven. Three methods are provided in this recipe: stand mixer (the easiest and recommended), hand-kneading (10 minutes of effort), and a completely no-knead version for those who want the simplest possible route. The dough can also be shaped the day before and proved overnight in the refrigerator, making these hot cross buns entirely realistic to bake fresh for Easter morning without waking at dawn.167 minsintermediateEaster Recipes Special: Hot Cross Bun Bread
Hot cross bun bread is what happens when the traditional Easter recipes of the hot cross bun are upgraded into a loaf. The recipe yields a high-top, cafe-style bread that has all the aroma and richness of the classic Easter treat in a form that is far easier to make, slice, and toast. The spices remain the same (cinnamon, allspice, and orange zest), the fruit is the same (plump raisins and dried cranberries), and the sticky honey glaze and distinctive white cross on top are all present as well. What changes is that instead of individual buns that require shaping and spacing, hot cross bun bread is baked as a single loaf, in a tin. One of the Easter special recipes, this one has dried fruit macerated for two hours in Earl Grey tea before being folded into the dough. Earl Grey has bergamot and citrus flavour that complements the orange zest in the dough and adds a subtle floral flavour to the finished hot cross bun bread that a plain water soak could never achieve. The soaking liquid is incorporated into the dough alongside warm milk, melted butter, and instant yeast. The cross on top of the hot cross bun bread is made from a small, stiff dough of flour, water, sugar, and salt that is pressed into the surface of the loaf before the second proof, so it bakes cleanly into the crust. The honey-water glaze is brushed on while the loaf is still hot, giving it that signature sticky, golden finish.208 minsintermediateCheesy Garlic Pull-Apart Bread – Buttery, Garlicky & Loaded with Cheese
Cheesy garlic pull-apart bread features layers of soft, homemade dough or a crusty bread loaf cut into diamond shapes, stuffed with melted mozzarella and brushed with garlic herb butter. Its appeal is in the gooey strings of cheese that come out when you pull apart the bread slices.50 minsintermediate
Plate it up!
Plate it up!

Share
Save for later
Veg
Chocolate Modak: Traditional Modak with a Chocolatey Twist
30mins
|Easy
Share
Save for later
Veg
Luxurious Khubani Ka Meetha: Saffron-infused Apricot Dessert
30mins
|Easy
Share
Save for later
Veg
Sorghum Kesari: A Flavourful South Indian Dessert
15mins
|Easy