Khapli Atta
Khapli Atta Nankhatai With Cardamom Rich Bakery Style Crunch
Khapli Atta
43 mins
Cooking Time
Easy
Difficulty
10
Ingredients
Veg
Diet
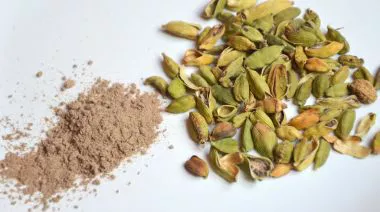
Khapli Atta Nankhatai brings an old bakery-style biscuit into a more wholesome space by using emmer wheat flour instead of refined flour. The slightly nutty flavour of khapli wheat works beautifully with slow-melting ghee and cardamom, giving each cookie a richer finish without becoming overly sweet. These biscuits are often baked during cooler months because the aroma of roasted flour and warm spice fills the kitchen quickly and pairs naturally with evening chai.
Aashirvaad Chakki Khapli Atta adds depth to this recipe because the flour is made from ancient emmer wheat known for its naturally high fibre and higher protein content. The brand also highlights that its khapli wheat passes through 40+ quality checks, which helps maintain consistency in texture during baking. Since the flour absorbs moisture differently from regular atta, the dough develops a delicate crumb that stays light instead of chewy.
Traditional nankhatai recipes were originally influenced by bakery biscuits sold in coastal trading towns during the colonial period. Over time, Indian households adapted them with ghee, cardamom, and local flours. This version keeps the familiar crumbly bite while introducing khapli atta into everyday baking. The slight earthy taste balances the sweetness nicely, making the biscuits feel comforting rather than sugary after one bite.
Ingredients
UNITSIngredients
1 cupAashirvaad Chakki Khapli Atta
¼ cupGram flour (besan)
½ cupPowdered sugar
½ cupGhee
½ tspCardamom powder
¼ tspBaking powder
1 pinchSalt
1 tbspChopped pistachios
1 tbspAlmond slivers
1 tbspMilk (optional, for binding)
Khapli Atta Nimki Recipe For Crispy Tea-Time Snacking
Khapli Atta Nimki is a crunchy tea-time snack rooted in traditional Indian kitchens, where simple doughs were shaped into layered bites and fried for long shelf life. The use of Khapli atta in this version adds a rustic depth that makes the snack feel more wholesome without changing its classic crisp structure. The highlight of this preparation comes from Aashirvaad Chakki Khapli Atta, made from ancient emmer wheat. This flour carries 30% more protein than regular wheat and is naturally rich in dietary fibre, which supports better digestion. The grain also has a lower sugar profile, making the nimki feel lighter even after frying. Each batch of this flour goes through 40+ quality checks, ensuring consistent texture and purity. When used in nimki dough, it creates a firm base that rolls easily and fries into distinct flaky layers. The result is a snack that feels traditional yet nutritionally upgraded, ideal for festive platters or everyday tea breaks.32 minseasySweet And Spicy Lemon Pickle Recipe For Rice And Parathas
Sweet And Spicy Lemon Pickle has long been part of Indian kitchen shelves, especially during warmer months when lemons are juicy and naturally fragrant. The balance of tanginess from citrus and mellow sweetness from jaggery creates a layered flavour that keeps getting richer over time. Families often prepare small batches before summer vacations because the pickles stay usable for weeks when stored properly. Unlike very sharp pickles, this version develops a rounded taste after resting for a few days. The chilli powder brings gentle heat, while mustard oil and fenugreek add depth. A well-made lemon pickle recipe works beautifully with dal-rice, stuffed parathas, curd rice, and even plain khichdi when meals feel too simple. Another reason this pickle remains popular is the texture. As the lemons cure, the peel softens and absorbs the spices slowly. Many traditional homes still leave the jar near sunlight for a few hours daily, allowing the flavours to mature naturally without artificial preservatives.20 minseasyForgotten Sindhi Recipes: Seyun Patata Featuring Vermicelli Aloo Sabji Recipes
Seyun patata is one of the traditional Sindhi recipes that tends to be a breakfast dish, combining two contrasting elements: one sweet – roasted vermicelli (seyun) – and one spiced – fried potatoes (patata). It is widely prepared in Sindhi households for everyday breakfasts as well as for festive and ceremonial occasions, and is especially popular for its lightness and for taking little time to prepare. The vermicelli is typically roasted in ghee and cooked with spices in milk, while the potatoes are deep-fried and seasoned separately. There is a custom associated with this dish: on the day after a couple’s wedding, the bride’s parents send a lavish meal to the bridegroom’s house. Among the various breakfast items, which tend to feature lovingly cooked aloo sabji recipes, there’s also this vermicelli dish. The Seyun Patata is sent in a decorative dish garnished with nuts and sent over. Sheer khurma shares a similar recipe to vermicelli. The dish also represents abundance and celebration, and its preparation is quite symbolic. What makes Seyun Patata distinctive is that, unlike many wet and dry dish combinations like misal pav or dahi vada, this is one of the few Sindhi recipes where the wet vermicelli is served separately with the ‘kurkure’ masaledar potatoes. They might be on the same plate, but they aren’t mixed together, making for a really unusual dish in terms of flavour, when you compare it with either mildly sweet breakfast dishes or the savoury ones Indians are used to.45 minseasy
Khapli Atta Nankhatai uses emmer wheat flour, which gives the biscuits a nuttier taste and slightly heartier texture compared to versions made with refined flour.
Share
Save for later
Veg
Homemade Garlic Bread: Delicious, Buttery, and flavorful
90mins
|Moderate
Share
Save for later
Veg
Crispy Fafda
10mins
|Easy
Share
Save for later
Veg
Til Gur Gajak: Traditional Indian Sweet
60mins
|Easy